Wednesday, June 18, 2014

Sister Home coming: Blueberry Cheesecake Tart!


My elder sister Sara and her husband is coming to our place in CA from Bangladesh for an entire week. I will be meeting them after 6 long months!! I was perplexed about what to bake for them as a welcome dessert. Later, I came up with the idea of blueberry tart. Can't wait to share a slice with my sister! <3

Blueberry Cheesecake Tart


Ingredients:

For Base:
1. Vanilla Wafers- 1 box (11 oz), I used the one with cream and sugar included so did't add any additional sugar in the base.  
2. Butter- 1/3 cup, melted

For Filling: 
1. Cream Cheese- 4 oz (buy a 8 oz box and use half of it)
2. Whipping Cream- 3 tbsp
3. Sugar- 1 teaspoon

Topping:
1. Fresh or thawed blueberries (recommended fresh): 1 package   *You can use any kind of berry or fruits*
2. Sugar- 1/2 tbsp (or taste wise)
3. Water- 1/3 cup

For baking: 9 inch pie pan 

Process: 

1. Crush the wafers with hand and add the melting butter. Now put it onto the 9 inch baking pan and press the crumbs gently alongside the pan. This should look like this. I have added some white chocolate chips just to bind them together. This is optional. Bake this tart crust now for 5 minutes at 475 degrees. Rest is aside to completely cool. 


2. Now in a bowl, add the whipping cream, cream cheese and sugar and blend them together until they form a peak. 

3.Using a spatula, now gently pour the mix over the cooled crust. This should look like this: 
Rest the tart now in fridge for an hour to set. 


4. Now it's time for preparing the filling. Take 1/3 of the blueberries and in a saucepan, add sugar, water and the taken blueberries for making a thick syrup. Leave the remaining blueberries in a bowl for the later use.


5. After making the syrup, mix it with the remaining blueberries. Now you can pour it over the cooled tart, using a spoon. 


6. For best results, rest the tart in fridge for an hour and serve it with whipped cream and a hint of mint. It remains edible for the next 2/3 days. 


Enjoy! 

Sunday, June 15, 2014

House Warming Feast continues: Cherry glazed caramel pudding!

As promised, I am back with my second experiment with the caramel pudding: the cherry glazed version. Now cherry topping is readily available in market but I thought of making of my own. It is super easy and it adds such an extra layer of yumminess that my guests were very pleased with it's texture and taste! 

Cherry glazed Caramel Pudding! 


Ingredients: 

1. 4 Eggs
2. 2 cups whole milk 
3. 1 1/4 cup sugar (divided)
4. 1 drop of vanilla essence
5. 1/2 cup of cherries (fresh or frozen)

Process: 

1. In a saucepan, stir 3/4 cup of sugar on a medium flame until it is dissolved and turn golden. Make sure, you do not burn the caramel, as it will taste very bitter then. If you burn your first batch, no problem, start from scratch again. 

2. Now in a separate pan, beat the eggs, vanilla, milk and remaining sugar with a mixer.  Please make sure that the mix should not get foamy due to over beating. 

3. Pour the mixture into the caramelized sauce pan and place it onto the preheated oven (350 degrees) for 35-40 minutes. Run a knife to see if it comes out clean. If yes, the pudding is baked. 


4. Cool the pudding on a rack and place it onto the serving plate gently. 

5. In a saucepan, add the cherries, a bit of sugar and 1/4 cup water on a medium heat. Let the sugar dissolve and stir occasionally to get a thick consistency. Pour the cherry glaze onto the caramel pudding and let it cool in the refrigerator. 

Enjoy!

House Warming Feast: Blueberry infused Caramel Pudding!

So after getting married in Decemeber '2013, I moved with my husband in Indiana, USA where he is currently studying. We have a great student community here. You can tell that they are my second family. Me and my husband were thinking about a house warming party so I got busy with the menu. For dessert, I wanted to make Pudding- 3 styles. One style is known to all, the classic cream caramel pudding. For the rest of the two, I decided to go with Blueberry infused caramel pudding and Cherry glazed caramel pudding. Both of them were my first trials so I was keeping my fingers crossed. It was lovely to see that my guests finished the last bit of pudding slices and also asked for recipes. Nothing can be more satisfying for a baker at that point. I was overwhelmed and grateful to Almighty for everything being right. Let's share with you the first experimental pudding today and I will be back with the other experiment as the next recipe. 

Blueberry infused Caramel Pudding


Ingredients: 

1. 6 Eggs
2. 3 cups whole milk 
3. 1 1/2 cup sugar (divided)
4. 2 drops of vanilla essence
5. 1/2 cup fresh or frozen blueberries

Process: 

1. In a saucepan, stir 3/4 cup of sugar on a medium flame until it is dissolved and turn golden. Meanwhile, add 1/4 cup of  fresh or frozen raspberries into the caramel and stir occasionally in a soft hand. This will turn the caramel into a beautiful purple color. Make sure, do not burn the caramel, it will taste bitter then. 

2. In a separate pan, beat the eggs, vanilla, milk and remaining sugar with a mixer.  Add the remaining blueberries (1/4 cup) and mix well. Strain the mix through a sleeve if you want to get rid of the skins of the blueberries. Make sure that the mix should not get foamy due to over beating. 

3. Pour the mixture into the caramelized sauce pan and place it onto the preheated oven (350 degrees) for 35-40 minutes. Run a knife to see if it comes out clean. If yes, the pudding is baked. 

4. Cool the pudding on a rack and place it onto the serving plate gently. Dress it with vibrant blueberries! 

* Optional: You can use blackberry, strawberry, raspberry or cherry instead of blueberry. Recipe remains same. Just follow your intuition to balance the natural sweetness of the fruit used and the amount of sugar required to be added to the recipe. Over-sweetness is a strong NO-NO for a perfect caramel pudding. 

Enjoy! 


Friday, June 6, 2014

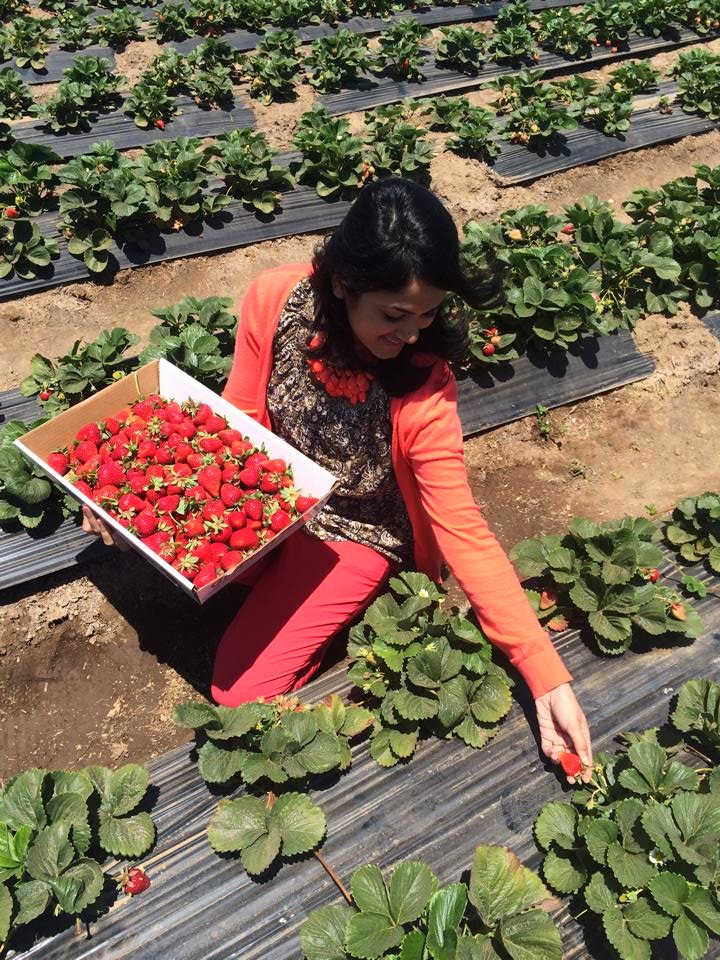
Strawberry Cheesecake Tart: First ever Berry picking Experience!

It was not only the joy of baking after so many days but also to be able to use self picked farm fresh strawberries from a nearby ranch! 


Strawberry Cheesecake Tart


Ingredients: 


Crust: 
9 chocolate graham finely ground (1 cup)
5 tablespoons unsalted butter, melted
1/4 cup sugar

Filling:
1 package of cream cheese (8 ounces, softened)
Heavy whipping cream- 6-7 tbsps
Caster sugar- 1/4 cup
Vanilla essence- one or two drops (optional)

Process:

Make crust:
Preheat oven to 350°F. 
Stir together all ingredients and press evenly onto bottom and 3/4 inch up side of tart pan. Bake until firm, about 10 minutes. Cool on a rack 15 to 20 minutes. 

Filling: 
In a large bowl, beat the cream cheese, heavy whipping cream and vanilla until smooth. Gradually beat in caster sugar. Spread over the baked and rested crushed graham cracker base. 

Last but not the least, Arrange strawberries over filling; if you want you can brush the berries with jelly. Refrigerate the tart for at least 2-3 hours. Remove sides of pan before serving. 

It yields: 6-8 servings. Enjoy!


***Sharing a photo of my first ever strawberry picking, fellows! Loved every bit of it.***


Valentine's Day Special: First cupcake baking for hubby!

Lemon Vanilla Cupcakes!

Didn't get a chance to propose before our marriage but who said life does't offer you a second chance? 

Here is my take on this Valentine, our very first Valentine, a day to express how much THAT someone means to you... yes, we love all of our loved ones round the clock but some days are meant to be there as a reminder of the joyous bond we share! 


Ingredients: 

1. 1/2 cup butter (room temperature) 
2. 3/4 cup sugar
3. 1/2 tea spoon vanilla essence
4. lemon zest from a large lemon
5. 1 1/2 cup all purpose flour
6. 2 tsp baking powder
7. 1/4 cup milk
8. 12 cupcake liners
9. Edible pearls for decor. 

Process: 

1.Preheat the oven at 350 degrees. 

2. In a bowl, mix flour, baking powder and keep aside.

3. Beat butter, sugar, eggs, vanilla essence, lemon zest by a hand mixer. 

4. Now put half of the flour with the mix and stir gently. Add milk and then mix the remaining flour. Give it a smooth texture by mixing with a spatula or wooden spoon. 

5.Fill in the cupcake liners with 3/4 of the batter and cook them in the middle of the oven for 20-25 minutes. Do not forget to use a toothpick to see if the cupcakes are done or not. If toothpick comes out clean, it means the cupcakes are baked.


6. Rest and cool the cupcakes before frosting. I used vanilla frosting with red and blue food coloring. It is note the food colorings are not harmful for health. If you want to make your own icing, even that is possible. The link to make a simple vanilla frosting is: 

http://www.simplyscratch.com/2010/12/simple-vanilla-frosting.html

You can use a piping bag to frost the cupcakes. There is no rule of doing it. Just play around with the icing and cupcakes. If you want to learn how to do different kind of decors with icing, please see the link below:

http://www.youtube.com/watch?v=mYy2uiK6T94

7. Now I finished the cupcakes off by writing with a icing gel pen and by sprinkling some edible pearls. My husband absolutely loved the surprise and it just lifted my love towards desserts one step ahead by seeing the smile on his face. 


Make someone smile today! Happy Baking! :)


Ekushey Dinner: Fun with Trifle!

Now we all know trifles look great on trifle bowl but I had to make trifles for our Ekushey Dinner at Purdue but didn't have the time to get a trifle bowl to serve. So I decided to go with the foil trays that are readily available in nearby walmart. Though the layers were not visible but the members of our Purdue community loved the vibrant decor and burst of fruity taste cutting through the whipping cream, custard and layered cake. I hope you will enjoy making them too. 

Fruit Trifle


Ingredients: 

1. Plain sponge cake - 2 (recipe same as lemon cake, if you want you can subtract the lemon flavor).
2. Half and half milk- 1 package (If half and half is not available just use the regular milk and thicken it)
3. Custard powder- 3-4 tbsps
4. Sugar- 2 tbsps
5. Fruits- taste wise (I used banana, apples, grapes to go with the custard and kiwi and strawberry as toppings)
6. Jello- 2 packages of your choice (I used lime and cherry). 
7. Whipped cream or cream cheese icing (for garnish).

Process: 

1. Place the sponge cakes (diced in small cubes) as a base in your serving dish. Now slice the kiwis and stick them to the edge of all sides of the serving dish (as per the picture). 

2. In a pan, bring 2/3 of the half and half milk to boil. Mix the remaining milk and custard powder and pour it onto the milk. Add sugar. Keep stirring to avoid lumps in the custard's texture. When it will get a think consistency, rest it aside. 

3. Now, slice the banana, grapes and apples and place them over cake base. Then pour the cool custard mix onto it and keep it in the fridge for an hour to set. Also, prepare the jellos by mixing it with water in two separate bowls and keep it in the fridge to set in the same hour as custard.

4. Beat some whipping cream (In BD, you can find the mix whereas in States, we get the whipped cream ready, it looks like vanilla ice-cream). Now make a layer of cream over the custard's layer and put into the fridge to set for an hour. 

5. Meanwhile slice the strawberries and remaining kiwis. After an hour, bring out the jello and cut in small cubes. Now garnish with a row of jello, fruits and heavy whipping cream with an aid of a piping bag. You can also use cream cheese filling as the taste of it perfectly goes with custard and fruity taste of the trifle. 


When you will be making trifle in a trifle bowl, you can add more layers like jello, mash mellows etc. Trifle can be played with so many flavors and colors that it is a real treat for desserts lover when they attempt to make it. Every time, it gets even better, even delicious! 

Enjoy!

For a Farewell: Lemon Supreme-Raspberry Jello cake!

I was reading two or three recipes at a time and I thought of combining the idea of a jello cake and a lemon cake together. The occasion was a farewell of one of our family members from Purdue committee. The members of our community seemed to love the cake and for me the compliment of the day was my cake was sitting next to a store bought cake and people couldn't distinguish from taste which one is home baked and which one is not. I couldn't be happier. This looks amazing when put together but the recipe is amazingly simple! I would say, it you love baking, it's a must try!

Lemon Supreme-Raspberry Jello cake!


Ingredients-


1. 2 cups all purpose flour
2. 1 1/2 tbsp baking powder
3. 1/2 tea spoon salt
4. 1/2 table spoon lemon zest

5. 1/4 pound unsalted butter
6. 1 1/2 cup sugar
7. 3 eggs, beaten
8. 1 tea spoon vanilla
9. 1 cup whole milk

10. 1 package whipped cream- thawed
11. 1 package raspberry jello
12. 1 package frozen raspberries


Process-


1. Preheat the oven to 350 degrees.


2.  Mix the dry ingredients like flour, baking powder, salt and give it a good stir with electric mixer.


3. In a separate bowl, mix the eggs, milk, sugar, butter, lemon zest,vanilla essence and beat it for 30 seconds in a low speed. Now pour the dry mix (previous point) and mix it for 2 minutes at a medium speed. Pour the batter in a cake pan (I used circular) and bake it for 30-35 minutes until a toothpick comes out clean when inserted.  


4. Now mix the gelatin in 2 cups warm water and 2 cups cold water. Put the frozen raspberries into it and stir well. Refrigerate it for 2-3 hours.


5. Now slice the cake in half. Spread the whipped cream and close the cake lid.


 6.Now spread the whipped cream over the cake with a spatula. Keep it for setting approximately for half an hour.


7. Now warm the gelatin pan by putting it over warm water or use a knife to sharpen the edges. Now place it upside down over the cake. Let is freeze for an hour or two. Serve cold.


***Photo taken during the farewell. 

Note: You can use fresh raspberries instead of frozen. I couldn't find the fresh ones at nearby store that day so went with the frozen ones.The recipe can be replaces by strawberries, blue or blackberries. Switch the gelatin flavor likewise! 


Enjoy!