Monday, October 17, 2016

Dark Chocolate Almond Puff Pastry: Absolute Chocolate-y!


Baking on weekends are bliss.. no rush.. so I love to experiment during this time. Always have a special thing for dark chocolate so anything with that is heaven alike to me! I tried the good old recipe of puff pastry having a gooey chocholate-y center inside. Its super easy and kids/not-so-kids everyone love it! You can have it with your morning or afternoon tea/coffee on a lazy day. Also, we can not really go wrong with chocolate, right? Let me know if you try this! Go baking!


Ingredients 
Puff pastry- 1 sheet 
Dark chocolate (I used 48%)- 1 bar 
Almond/Nuts- optional 
Egg- 1 (for wash)


Process:
1. Preheat the oven at 425 degrees. 
2. Thaw the puff pastry (usually I just keep it on the kitchen bench for 15 minutes or so). 

3. Open the pastry and place the chocolate bar in the middle.

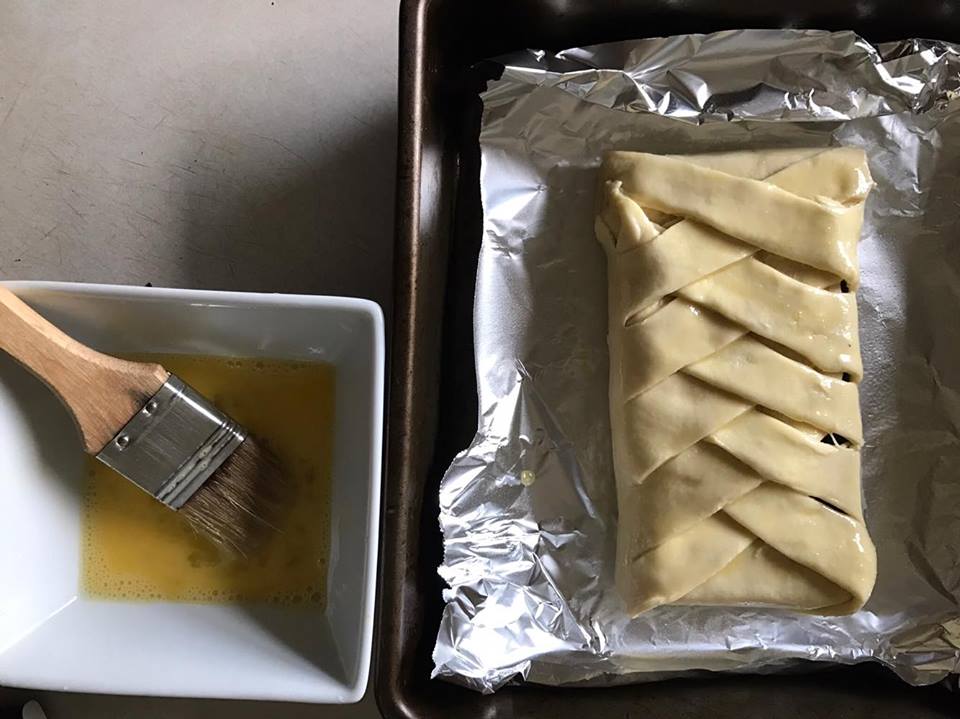
4. Now as of the picture, cut the pastry diagonally. 

5. Now trim the edges and fold the upper and lower portion. For sides, make it as a braid (picture) by folding the pastry diagonally, one side after the other.

6. Make sure its tight otherwise you will see burst of chocolate during the baking.
7. Now gently give egg wash and sprinkle nuts. 

8. Bake for 25 minutes or until crisp-brown. 

9. Serve immediately, it will not taste as good if it gets cold! The texture is crispy with a gooey chocolate-y center inside! Yum!

Enjoy! 

Friday, October 14, 2016

Peach Mousse Cheesecake (NO-BAKE)

I had my closest neighbor (more like my elder sister's) Birthday coming up in past week. I wanted to try this fresh peaches and cheesecake mousse for so long and thought it will be a great occasion. I'll say its a very handy recipe if you want to try no-bake recipes for your family, friends or colleagues at office. You can make it up to 2 nights before, and as they say, the longer a cheesecake waits, the tastier it gets! Enough of my blabbering, now let's get to the ingredients and how to make this simplest yet yummilicious dessert!


Ingredients 

For the Crust: 
Oreo/Graham (chocolate preferably) cookies- 20-24 pieces
Butter- 1/4 cup (melted)

Cheesecake filling:
Cream cheese - 16 ounces (softened)
Plain Yogurt- 1/2 cup
Warm milk- 1/3 cup
Unflavored gelatin- 3 ounces

Jello topping: 
Peach jello- 3 ounces
Fresh peaches- 2 (varies)

Baking needs:
A spring form pan (9 inch)


Method:

1. Crush the biscuits (I usually take a zip lock bag and boom, keep hammering until they are fully crushed).

2. Mix the melted butter with the crushed oreos. Now gently press it on the spring foam pan.  You may grease the pan with little butter before putting the crust, it helps while you cut the cheesecake later.


3. In a bowl, take cream cheese and yogurt, mix it together. Now in the warm milk, pour the unflavored gelatin. Give it a stir and add this to your cream cheese mixture. Make sure there are no lumps.

4. Pour the cream cheese filling over the oreo crust. Now keep it in the fridge for good 15-20 minutes.


5. In the meantime, slice fresh peaches (you may use any other fruit or jello flavors, I like peaches for its subtle flavor). For the next part, we need to prepare the peach jello. For peach jello using in this kind of recipes we need to use 1/2 the amount of water than what's needed in a regular time jello prep. So take 1/2 cup of boiled hot water and pour the jello mix. Stir is well until the jello gets dissolved. Now add 1/2 cup of ice cold water. Keep the jello mixture in room temperature.

6. Let's bring out our chilled cheesecake for the final layer. Place the peaches as you like and as much as you like! Lastly, pour the jello gently over the peaches. I use back of a spoon while pouring the jello as it helps to pour it evenly.


7. It is the most difficult time as you can not dig it in right NOW. Please keep it in the fridge for 4 hours to overnight for best results.

When you are ready to serve, simply open the spring form pan and place the cheesecake on the serving plate. Don't worry, it should be well set to transfer by now.

Make sure you have a warm knife to cut through the glistening slices of the cheesecake! Hope you'll enjoy making it as much as I did! My friends said, the mousse tasted very refreshing after a gorgeous Birthday Party Dinner!

Saved a slice from the party, haha! 


What are you waiting for? Try it out soon and let me know how it went! 
Happy Cheeeeeeesecake Making! :) 


Thursday, July 21, 2016

Raspberry Jello Mousse Cake!

I figured it's been a year since I had my last blog up! Been busy with Masters and the routined life made me a bit lazy lately but it's time to catch up now with some recent trails. Today, I am going to tell about a three layer dessert- having a sponge cake base, with a velvet alike raspberry mousse and fresh raspberries with jello on top! It was a crowd pleaser at my past week's dinner party. I learnt it from one of my favorite dessert makers, Natasha (link below) and I am so glad that I decided to try this on for my friends. You can always replace the fruit and jello flavors to your liking so that's the best part! Let's see the ingredients and dig in the process now:


Ingredients:

For sponge cake (bottom layer)

1 cup flour
1/2 cup sugar
2 eggs
1/3 cup oil
1/3 cup milk
1 teaspoon Vanilla extract (optional)

Cake syrup

2 tbsp sugar
1/2 cup water
2 tbsp lime juice

For Raspberry Mousse (middle layer)

Raspberry jello (6 ounce packet)-1
Whipped cream- 1 (8 oz)

For Raspberry Jello (upper layer)

Fresh raspberries- 1 package (contains 35-40)
Raspberry jello (3 ounce packet)- 1

Process:

1. Preheat the oven at 350 degrees. Mix the eggs and sugar. Now beat by adding oil, milk and flour. Grease the 13 by 9 inch pan and gently pour the cake batter. Bake for about 20-25 minutes or until golden brown.


2. For the mousse, mix the jello (6 ounces) with 2 cups boiling water until it gets dissolved. Add 1 cup ice cold water and keep the mixture in room temperature. Beat it with the whipped cream for a smooth consistency. Don't worry, it will not get entirely set at the room temperature.

3. Now, take the cake out of the pan now and cut the corners. Place it back on the clean 13 by 9 inch pan. It is optional but preferred to brush the syrup for a moist sponge base.


4. Now pour the mousse mixture over the cake. Put fresh raspberries as indicated in the picture and let it set for 1 hour in refrigerator.


5. After 45 minutes of the mousse being set, make jello (3 ounce packet) with 1 cup boiling water and after it gets dissolved, add 1/2 cup ice cold water. Let it set in room temperature for 10-15 minutes. Put the jello mixture over the mousse and fresh raspberries. DO NOT put warm jello as it will split. Let the dessert set overnight for best results.


Natasha's Tutorial: http://natashaskitchen.com/2014/11/25/raspberry-jello-cake-recipe-video-tutorial/


Friday, May 22, 2015

Mothers' Day Special: Do I hear Crêpe?


French Crêpes

Although my mother was not with me on this year's Mothers' day, I wanted to make something new for her and to show her on Skype! She was very happy, definitely going to make her these deliciousness  the next time I visit her in New York.  


Ingredients: 

1. All purpose flour- 1 cup
2. Eggs-3
3. Milk-1 cup
4. Butter- 2 tbsp (melted)
5. A pinch of salt
6. Sugar- 1 teaspoon (avoid if you want to serve with maple syrup or honey)


Process: 
1. Mix together flour, salt and sugar. Keep it aside. 
2. Beat eggs and milk with a whisker. Beat with flour until its a smooth mixture. Add in butter and mix it. 
3. Make sure your pan is hot. Brush with a little bit of butter or oil (I prefer oil). Pour 1 ladle of mix in the pan and move it around (like a roti). Make sure to spread it thin. Please refer to my previous post, Patisapta to see how the mixture and roti look like!

4. When it's brown flip on the other side, serve hot. I prefer it with maple syrup and fresh berries. 

What I like about this recipe is, it's super easy to make and have all the necessary breakfast ingredients. Not only that, it's a gorgeous looking dessert kind of breakfast which can lift the mood of your loved ones! 


Enjoy! :)

Sunday, April 19, 2015

Patisapta: Traditional Pancake of Bangladesh

Patisapta: The Bengali take on English Pancake or French Crepe, I would say, our home made kheersha filling can easily beat the rest! ;)  


Batter: 

1. All purpose flour (deshi moida)- 1/2 cup
2. Suji or samolina- 2to 3 tablespoons
3. Rice flour (chaler gura)- 1/4 cup
4. Milk- 3/4 cup
5. Jaggery  (melted gur)- 1/3 cup
6. Salt- tastewise (a pinch)

Khirsha (filling):

1. Evaporated milk (or very thicken milk)- 2 cup
2. Suji- 1/2 tablespoon
3. Rice flour- 1/2 tablespoon
4. Cinnamon & Cardamom- 2/3 
5. Jafran (optional)- few strands


Process: 

1. Mix all the ingredients for batter. It should be of a medium (not too thick or too watery) consistency. Rest it aside for 30 minutes while we make the filling. 

2. Keep 2-3 tablespoons of milk separate and mix suji with it.  

3. Boil the milk in medium shimmer.  Gradually add sugar and rice flour. Keep stirring with a steady hand. 

4. Slowly, this mixture will turn into a consistency of kheer. It should be thick, don't worry! 


5. If you wish, at this point you may add sliced pista or almonds, but I like the kheersha plain. 

6. Keep it in room temperature, let it cool down. 

7. Heat a non stick pan now and brush it with  little ghee/oil. With a ladle, pour batter mix on the pan. Swirl it over the pan to make a thin roti. Now its time to put the stuffing and gently fold it sidewise. 


8. Patisapta is ready to serve!!! 


ENJOY !!  :)

Monday, October 13, 2014

For The Oreo Lovers- Cookie 'n' Cream Cake!

Oreo Cookie Cream Cake

So, it was a birthday of a very special sister, Mun apu. I got to know about her Birthday in the afternoon and we (the gang here in Purdue) were supposed to give her a surprise by going to her place at 12 midnight. I was planning to bake a cake with oreo for the last few days and I thought this could be a wonderful opportunity to play with it as you can't get wrong with oreo!! I was very happy to see that the birthday girl was over the moon by seeing her cake and our friends were ecstatic too! It is super easy to bake, frost and decor! The fascinating part- not only the taste but it does look scrumptious! 


Ingredients: 
For Cake: 

- 2 cup all purpose flour 
- 1 cup cocoa powder
- 1 teaspoon baking powder
- 1 cup milk
- 1 teaspoon salt (optional)
- 1/3 cup vegetable oil 
- 3 large eggs (room temperature) 
- 1 teaspoon vanilla essence
- 1 cup brewed coffee (hot)

For Whipping Cream:


- 2 cup heavy cream 
- 2 teaspoon vanilla extract
- 2 tablespoon confectioner's sugar (powdered sugar)

For Oreo topping: 

-Oreo Cookies - 24-28 cookies

Process: 

1. Preheat the oven at 350 F. 

2. Stir together all the dry ingredients listed for the cake and keep that aside. 

3. Now in a separate bowl,  add milk,  oil, eggs and vanilla and combine them all.  Next, add the dry ingredients (step-2) slowly into this mixture.  Add the coffee. Don't worry if the batter is thin. 

4. In a greased 9 inch pan, pour the batter and bake for about 30-35 minutes. Baking time varies on the pan size so keep an eye when 25 minutes are over. Insert a toothpick and if that comes out clean, your cake is ready. Rest is aside to cool. 

5. Now when the cake is cooled down, slice is into half (horizontally). 

6. In a bowl, beat heavy cream until it forms stiff peaks. Now add vanilla and sugar. Don't over beat it, then it will become like butter. Now mix 14-16 crushed oreo cookies to the whipping cream. Spread half of the whipping cream over one slice of cake and close the lid with other slice of the cake.

7. Dollop the remaining whipping cream over the cake. *Optional: now if you wish, you can make small disk size decors with chocolate ganache or frost and dip one oreo cookie onto each disk. In the middle, crust 3/4 leftover oreo cookies and your cake is ready to go into the refrigerator. You can dip the cookies without the ganache or choco-frosting too. 


8. Keep it cool for at least 2-3 hours before you cut slices for the crowd. 


Enjoy!  


Saturday, October 11, 2014

Eid-ul-Adha Special: Toasted Coconut & Cherry Glazed Vanilla Cake!

Toasted Coconut & Cherry Glazed Vanilla Cake 

For many days, I wanted to bake a cake using coconut flakes. Eid-ul-Adha gave me a good opportunity to experiment with the flakes and guess what, my guests loved it! Looking forward to try macaroons with coconut flakes next time. Until then, enjoy this super-easy but exotic dessert for your dinner party! 


Ingredients 

For Cake: 
- 2 cup all purpose flour 
- 1 teaspoon baking powder
- 1 cup milk
- 1 teaspoon salt (optional)
- 1/3 cup vegetable oil 
- 3 large eggs (room temperature) 
- 1 teaspoon vanilla essence
- 1/2 drops of food color (I have used yellow and pink)

For Coconut & Cherry Topping:
- 1 1/2 cup shredded coconut (sweetened) 
- 1 cup Fresh cherries
- 2 tbsp sugar 
- 2 tbsp water

For Whipped topping: 
- 2 cup heavy cream 
- 2 teaspoon vanilla extract
- 2 tablespoon confectioner's sugar 

Process: 

1. Preheat the oven at 350 F. 

2. Stir together all the dry ingredients listed for the cake and keep that aside. 

3. Now in a separate bowl,  add milk,  oil, eggs and vanilla and combine them all.  Next, add the dry ingredients (step-2) slowly into this mixture. If you are wishing for bi-color cake, separate the batter in two pans, mix yellow food color in one and pink in another. 

4. In a greased 9 inch pan, pour one colored batter and bake for about 30-35 minutes. Baking time varies on the pan size so keep an eye when 25 minutes are over. Insert a toothpick and if that comes out clean, your cake is ready. Rest is aside to cool. Next, bake the other colored batter in the same way. 


6. Toast the coconuts either on stove top or in oven using a baking sheet. Please hit this link: http://www.mybakingaddiction.com/how-to-toast-coconut/ to know more about how to toast the coconut flakes.


7. Now add fresh cherries, sugar and water in a pan and start making a syrup. Don't make it of too thick consistency. 

8.  In a bowl, beat heavy cream until it forms stiff peaks. Now add vanilla and sugar. Don't over beat it, then it will become like butter. Your whipping cream topping is now ready!

9. It is the fun time now. Spoon over whipped cream over one color battered cake, drizzle some toasted coconut flakes if you want. Now cover it with another cake as a lid. Pour remaining whipped cream all over the top and on the sides of the cake. Dust with generous amount of coconut flakes, don't worry if they start dropping. Most of it will stick to your cake.


10. Last but not the least, pour the cherry glaze over the cake and refrigerate it for 3-4 hours. I made it a day before Eid, and the next evening, it tasted divine!    
                 Finally, don't forget to save a slice for yourself... ;)


Let me know how did you like the recipe! Happy Baking! :)