Wednesday, July 30, 2014

Eid Special: My all time favorite dessert: TIRAMISU !!!

Tiramisu means  "pick me up" or "lift me up". It is a popular coffee - flavored Italian dessert, made of ladyfingers biscuits (origin:Italy) dipped in coffee, layered with a whipped mixture of eggs, sugar and mascarpone cheese, finally flavored with cocoa. Now the issue in question is these ingredients are quite delicate and can not be readily found in every grocery store. I went to three known superstores but couldn't find ladyfinger cookies so I decided to substitute them with wafers. For instance, I made my own mascarpone cheese using butter, cream cheese and heavy whipping cream milk. Also, an elder sister of mine raised the question of halal:haram issue that we often face in States while getting the right ingredients. Thereby, I wanted to make tiramisu using ingredients that are readily available (the best substitutes of ladyfinger cookies and mascarpone cheese) and trust me, making tiramisu is not as difficult as you might think! 

Tiramisu


Ingredients:

1. Dark chocolate wafers - 4 packets
2. Egg Yolks-6
3. Vanilla essence- 2 drops
4. Whipped cream topping-1 package **(if you want to make it at home, whisk 1 1/2 cup of heavy whipping cream using a hand mixer for 10-15 minutes)
5. Expresso instant coffee mix -1 tea spoon
6. Warm water- 1 cup
7. Unsweetened cocoa powder- 1 cup
8. Sugar- 1 cup **(if it's powdered sugar, it's easy to incorporate)

For mascarpone cheese:
1. Butter- 2 sticks (melted)
2. Heavy whipping cream- 1/4 cup (*you can thicken 2-3 cups of milk to get the right texture of heavy whipping cream) 
3. Cream cheese - 1 package (8 ounces) 

Process: 

1. For making the mascarpone cheese, in a bowl, mix together butter, heavy whipping cream and cream cheese. It can be used and stored for later use.

2. Then, take boiling water in a cup and mix the expresso instant coffee mix and rest it aside for later use. 

3. Next, set a double boiler (if it's of round shape, it will be good) on a pan of boiling water. Add the egg yolks, essence and sugar. Keep whisking the mixture for about 10-12 minutes to cook the yolks. In the halfway, add 2 tbsps of milk to smooth the mixture. Let this cool completely at room temperature.


3.  Now, you can make the heavy whipping cream at home but I got myself a readymade whipped topping to save some time. If you want to make it at home, just take 1 1/2 cup of whipping cream and whisk it for 10-15 minutes until it forms soft peaks. Keep it aside.

**images of egg yolk mixture and the mascarpone cheese-whipped cream mixture.

4. Now in the egg yolk mixture, add the mascarpone cheese (or the substitute mentioned in the top section) and fold with a soft hand. Then add the whipped cream (point no.3) and make sure you do not beat this mixture but fold with a spatula in a really soft hand. You might find it tiring at times, but it will come together slowly. Just have a little patience with it! ;)

5. Finally. it's the fun time and that's the awesome part of making tiramisu. The Assembling Part! My hubby also got interested and helped me with assembling, just to note he is not that much into cooking!! Now, Let's dip the wafers in the expresso coffee mixture and place it in the serving bowl. 
                       

6. Take spoonfuls of mascarpone-egg yolk mixture and smoothly spread it over the coffee dipped wafers. Repeat the layer of soaked wafers and then again pour the final layer of mascarpone-egg yolk mixture.  So, in short, it's a wafer-cream-wafer-cream texture. You can add some crushed wafers instead of full size ones in the second layer of wafers (like I did) and shredded almonds too to add your own little touch. 


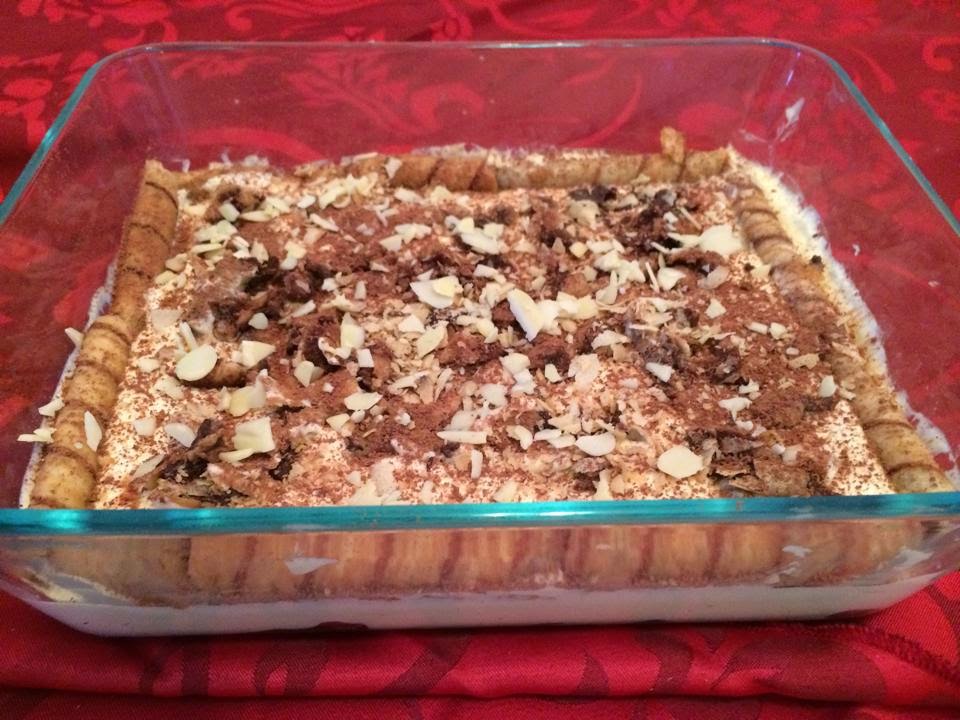
7. For the final stage, take some tablespoon of cocoa powder and dust a little bit of it through a colander just before serving. Refrigerate the tiramisu for 8 hours or more. For best use, make it a day before you need to serve it. The more it sets, the more it gets better, taste and texture wise.

Note: Many says, tiramisu needs wine to get that oozy flavor but it is neccessarily not true. It can be made without alcohol so now there is no such ingredients in tiramisu that we can not consume as muslims. 

Serves: 12-14 people.


Enjoy the restaurant quality Tiramisu at home with your loved ones. Make it for a special occasion because this dessert does reflect elegance and romance, haha!


Tuesday, July 29, 2014

Eid Special: Shahi Jarda!

It was my first Eid after marriage so I tried so make some traditional desserts! :)


Ingredients:

1. Aromatic Rice-3 cups (I used Kalojeera)
2. Sugar- 2 1/2 cups
3. Jarda Color- 1 tea spoon
4. Ghee- 5-6 tbsps
5. Cardamom pods, Cinnamon sticks- 2-3
6. Almonds (shredded)- 1 cup
7. Mawa/Khoya-1 cup
8. Raisins-1-2 tbsp
9. Morabba- 1 cup
10. Water to boil- 6 cups
11. Orange juice- 1 cup
12. Orange peel- 1 tbsp
13. Dried fruits- 1/2 cup

Process:

1. Boil water in a pan. Add cardamom, cinnamon and the food color.
2.Wash and drain the rice. In the boiling water cook the rice until it is cooked but a bit firm. Keep the lid on.
3. After 10-15 minutes, drain the rice and keep it in room temperature.
4. Heat ghee in the large pan, add the rice and stir with a light hand for 1 or two minutes. Now add the sugar, some chopped almonds, morabba and raisin. Keep the flame low.
5. After a light stir, you can serve the Shahi Jarda immediately with nuts, khoya (mawa) and dried fruits of your choice. You can also add small sweets like the biye bari ones! :)


Serves- 10-12 people. Enjoy.


Saturday, July 19, 2014

Iftaar Special: Mini Lime Tarts!

It was my first ramadan in USA and lately we have been catching up with our friends through the Iftaar dawaats. Yesterday, we had invitation at one of our dear friend Sharly's house so I decided to bake something as cute as her. So I came up with the idea of Lime Tarts but the mini versions. Hope you would like experiment with mini bites like this one. 

Mini Lime Tarts 


Ingredients: 

For Tart shells:
1. All purpose flour- 1 1/2 cup
2. Sugar- 1/4 cup
3. Salt- 1/4 teaspoon
4. Butter (unsalted)- 1 stick (about 3/4 cup)
5. Vanilla essence- 2 drops (optional)
6. Cold water-2-3 tbsps

For Lime Tart filling:
1. Egg yellow-4
2. Custard Powder- 1/4 cup
3. Powdered or Caster Sugar- 1/2 cup
4. Full cream milk- 1 cup
5. Cold water-1/4 cup
6. Vanilla bean or essence- 1/2 teaspoon
7. Butter-2 tbsps
8. Lemonade (lime juice)- 1 cup
9. Lime zest- 1 tbsp

Toppings:
Cherry, Grapes and Papaya

Process:

For Tart Shells: 

1. In a food processor, combine butter and sugar. Now add the vanilla and water. In a separate bowl, shift the salt and flour and add to the butter-sugar mixture. Now mix on low speed until it forms a dough. 

2. Dump it onto a surface dusted with flour and roll it to a thin roti (flat disk). Now take butter brushed mini tart bakings cups or take the cupcake baking pans and press the dough firmly. Rest the tarts for an hour. 

3. Preheat the oven at 300 and bake the tart shells for 20 minutes. Make sure you put some rice on it to put the weight. After 20 minutes, prick the tarts with a toothpick and remove the rice. Now bake again for 20 minutes or until golden. 


4. Allow the tarts to cool in room temperature. Do not freeze them. 

For Lime filling:

1. In a bowl, mix sugar, essence. Add custard powder with the full cream milk.  Whisk it well. 

2. Beat 4 egg yolks, lemonade and cold water. Now mix it with the previous batter. Add butter and lime zest. 

3. Keep it string on a low flame for about 15 minutes. Then turn it onto medium flame. Add butter and lime zest. Keep stirring until it thickens and looks shiny. Leave it to cool. 


4. Pour the mixture (1 to 2 tbsps each) on each tart shell and make sure the tarts are on a tray when you are doing so. Leave it to set in fridge for 4 hours. 


Toppings:

1. Add seasonal fruits (I used Cherry, Papaya and Grapes). You may use whipping cream, white chocolate chips or even just a piece of lemon to keep it simple. 


Make someone smile this Summer with a version of your tarts!  Enjoy! 

Monday, July 14, 2014

A different version of Shemai: Shemai Borfi

With Eid-ul-Fitr being coming in 15 days, I thought of sharing a recipe I learnt from my Mami, and that is Shemai Barfi. The name might strike strange to you at first but yes Shemai can be cooked as a barfi sort of dessert with the same ingredients we use for regular Jorda Shemai. I hope you will enjoy being on the journey of going through my recipe and will give it a try soon , who knows, may be this Eid!

Shemai Barfi 


Ingredients: 

1. Vermicelli (Shemai)- 1 1/2 package 
2. Ghee/Butter- 1 cup
3. Condensed milk (Full fat)- 1 can
4. Nuts of your choice- I prefer Pista & Almonds- 1/4 cup each, to garnish

Process: 

1. First break the vermicelli in small pieces (crush them but do not make a powder out of it, haha!) 

2. Then roast the vermicelli in a dry pan until it takes the golden color. Now keep it aside. 

3. In the same pan, heat the ghee/oil (ghee is better for flavor). Then put the vermicelli back in the pan and give it a gentle stir. Let the ghee well coat the vermicelli in a medium flame.

4. Now pour the condensed milk and make sure you give it a good stir quickly as the condensed milk will tend to thicken and clot the vermicelli quicker than you think. Mix it well and make sure the heat is low. 

5. Now place the vermicelli on a baking tray or a flat surface. Sprinkle the nuts and cut the square or triangle pieces while it is warm through a sharp knife. Rest it for 30 minutes and it should be ready to serve in no time. 


*For round shape, take a mini dessert cup, pour a bit of vermicelli from the pan right after mixing the condensed milk, wait a minute and invert the cup on a plate. Then sprinkle the nuts! 


Serve- 15-20 people. You can store it up to 1-2 days because later on the condensed milk tends to crystalize and it doesn't taste great like the day 1. 

Enjoy! 


Sunday, July 13, 2014

Baklava- First Iftaar treat at my place!

Baklava (from the Farsi for 'many leaves', a pastry perfected by royal bakers in the sultan's palace in Istanbul, consists of layers of crispy pastry filled with nuts and spices and drenched in a syrup.

It was always a dream dessert to me. Happy that I could make it, specially during Ramadan as it is one of the most popular traditional Middle Eastern desserts during the holy month. Moments worth remembering as it was our first Iftaar dawat for our friends! 

BAKLAVA


Ingredients: 


For Syrup:

1. 2 cups sugar, 1 cup honey or 3 cups sugar

2. Water- 2 cups

3. Cardamom- 1/2 teaspoon

4.  Cinnamon- 2-3 sticks
5. Vanilla essence- 1 or 2 drops, optional (I didn't use it)
6. Lemon juice- 2-3 tablespoons


For Filling:

1. Nuts of your choice- I used Pistachios and Walnuts- 2 cups each (Nuts should cover the surface of the baking tray you are using. 

2. Phyllo Dough- 1 package- 18-20 sheets 

3. Butter- 2 sticks (melted)


Process: 
1. To start with the syrup, stir up all the syrup ingredients and cook over low heat until the sugar dissolves. After 5-6 minutes, stop stirring, bring the heat to medium and wait until it's syrupy (a bit on dense side,but not too thick).


2. Preheat the oven at 350. 

3. Now place a sheet of phyllo dough in your greased pan and lightly brush that with butter. Repeat with 8 more sheets. Make sure you brush the sheets after every two sheets. It's time for the nut mixture now. Many use sugar, but I mixed 1-2 tbsps of the syrup with the chopped roasted nuts and gave it a light stir. Sugar can make crystals so syrup option looked good to me. After you have layered the nuts, now again place the remaining 9 sheets, buttering after every two sheets.  The top layer should have a well coated butter brush.


4. By using a sharp knife cut the baklavas in square or barfi shape. Trim any overhanging edges with a scissor. 


5. Now just before baking tap your soak with a little water and tap on the top layer. It will prevent the pastry from drying. First bake for 20 minutes, then put the heat on 300 degrees and bake for another 15 until it's golden. Don't over bake it as the nuts might get burn. 


6. Drizzle the syrup through the hot baklava. Sprinkle the pistachio dust over it. Let is rest for 4 hours in room temperature. Baklavas can be stored in air tight containers up to 1 week. If it dries out while storing, you can make additional syrup for it. 

Note: As Baklava is a very rich dessert, make sure your servings are small. 


Enjoy the royal treat with your family & friends. It was a big hit in my group of friends, I am sure it will work magic for you too!